Hexo博客Next主题安装配置教程

链接直达:Hexo主页 Next主题地址 Next文档地址

版本

版本 年份 仓库
v5.1.4 或更低 2014 ~ 2017 iissnan/hexo-theme-next
v6.0.0 ~ v7.8.0 2018 ~ 2019 theme-next/hexo-theme-next
v8.0.0 或更高 2020 next-theme/hexo-theme-next

安装

  • npm
1
npm install hexo-theme-next

使用npm安装要求Hexo是5.0及以后的版本

  • git
1
git clone https://github.com/next-theme/hexo-theme-next themes/next

指定版本安装:(以8.0.0版本为例)

1
npm install hexo-theme-next@8.0.0

Next历史发行版本

Hexo及插件版本:

配置

Next配置官方文档

  • 使用Git安装的配置文件位于/themes/next/_config.yml
  • 使用npm安装的配置文件位于node_modules/hexo-theme-next/_config.yml _config.next.yml

其中第一个`/表示博客根目录

1. 风格

1
2
3
4
5
# Schemes
# scheme: Muse
# scheme: Mist
# scheme: Pisces
scheme: Gemini

2. 不蒜子访客统计

busuanzi_count.enable设为true即可

1
2
3
4
5
6
7
8
9
10
# Show Views / Visitors of the website / page with busuanzi.
# For more information: http://ibruce.info/2015/04/04/busuanzi/
busuanzi_count:
enable: true
total_visitors: true
total_visitors_icon: fa fa-user
total_views: true
total_views_icon: fa fa-eye
post_views: true
post_views_icon: far fa-eye

3. 代码高亮

1
2
3
4
5
6
7
8
9
10
11
12
13
14
codeblock:
# Code Highlight theme
# All available themes: https://theme-next.js.org/highlight/
theme:
light: rainbow
dark: vs2015
prism:
light: prism
dark: prism-dark
# Add copy button on codeblock
copy_button:
enable: true
# Available values: default | flat | mac
style: default

内置代码高亮样式在/node_modules/highlight.js/styles目录下,也可在NexT Highlight Theme Preview进行预览。

4. 显示分类和标签

  1. 文章header部分添加
1
2
tags: Hexo
categories: 教程

  1. 新建page
1
2
hexo n page tags
hexo n page categories

此时会在/source目录下新增两个文件夹tagscategories,且两个目录下都有一个index.md文件

  1. 修改index.md

分别在tagscategories两个文件夹的index.md文件头部添加type

  1. 侧边栏显示标签和分类

修改Next主题配置文件_config.next.yml

1
2
3
4
5
6
7
8
9
10
11
12
13
# Usage: `Key: /link/ || icon`
# Key is the name of menu item. If the translation for this item is available, the translated text will be loaded, otherwise the Key name will be used. Key is case-sensitive.
# Value before `||` delimiter is the target link, value after `||` delimiter is the name of Font Awesome icon.
# External url should start with http:// or https://
menu:
home: / || fa fa-home
#about: /about/ || fa fa-user
tags: /tags/ || fa fa-tags
categories: /categories/ || fa fa-th
archives: /archives/ || fa fa-archive
#schedule: /schedule/ || fa fa-calendar
#sitemap: /sitemap.xml || fa fa-sitemap
#commonweal: /404/ || fa fa-heartbeat

5. 背景配置

更改标题黑色背景

  1. 打开Hexo/themes/next/source/css/_schemes/Pisces/_header.styl,找到background改为background: $blue-bright;

标题背景颜色默认为:background: var(--theme-color);,即默认为主题颜色,可直接在_config.next.yml配置文件中修改theme_color:即可改变背景颜色

修改背景颜色官方文档

1
2
3
theme_color:
light: "#222"
dark: "#222"

在线颜色选择器 | RGB颜色查询对照表

  1. 打开Hexo\themes\next\source\css\_variables\Pisces.styl,找到subtitle-color改为$subtitle-color = $whitesmoke;

  2. Hexo/themes/next/source/css/_variables/base.styl里可以查看颜色设置。

添加图片背景

  1. 在hexo目录下的source文件夹下新建_data文件夹,不是主题next目录下的source文件夹。文件夹里新建文件styles.styl,添加如下内容:
1
2
3
4
5
6
7
//背景图片设置
body {
background-image: url(/images/background.jpg);
background-repeat: no-repeat;
background-attachment: fixed;
background-size: 100% 100%;
}

background-image:url 可以直接使用图片链接,也可以是图片路径(将自定义图片放入next\source\images)

background-repeat:若果背景图片不能全屏,那么是否平铺显示,充满屏幕

background-attachment:背景是否随着网页上下滚动而滚动,fixed 为固定

background-size:图片展示大小,设置 100%,100% 的意义为:如果背景图片不能全屏,那么是否通过拉伸的方式将背景强制拉伸至全屏显示

  1. 打开主题配置文件,找到custom_file_path:,修改如下:
1
2
custom_file_path:
style: source/_data/styles.styl

页面透明化

为了更好欣赏背景图片,可将博客页面透明化,在source/_data/styles.styl里添加如下内容:

1
2
3
4
5
6
7
8
9
10
11
12
13
14
15
16
17
//文章透明度设置
.post-block {
opacity: 0.9;
}
//侧边框的透明度设置
.sidebar {
background-color: transparent;
opacity: 0.9;
}
//菜单栏的透明度设置
.header-inner {
background: rgba(255,255,255,0.9);
}
//搜索框(local-search)的透明度设置
.popup {
opacity: 0.9;
}

边框圆角

  1. 在hexo目录下的source文件夹下新建_data文件夹,文件夹中新建文件variables.styl,添加如下内容:
1
2
3
// 圆角设置
$border-radius-inner = 20px 20px 20px 20px;
$border-radius = 20px;
  1. 打开主题配置文件,找到custom_file_path:,修改如下:
1
2
custom_file_path:
variable: source/_data/variables.styl

6. 字数统计

  1. 安装插件
1
npm install hexo-word-counter

配置查看字数统计文档

7. fancybox

fancybox 可以在点击图片时放大该图片,并且可以快速浏览当前文章的所有图片

1
2
3
# FancyBox is a tool that offers a nice and elegant way to add zooming functionality for images.
# For more information: https://fancyapps.com/fancybox/
fancybox: true

8. 版权声明

NexT 内置了文章末尾增加版权声明,只需手动开启即可

1
2
3
4
5
6
7
8
9
10
11
12
# Creative Commons 4.0 International License.
# See: https://creativecommons.org/about/cclicenses/
creative_commons:
# Available values: by | by-nc | by-nc-nd | by-nc-sa | by-nd | by-sa | cc-zero
license: by-nc-sa
# Available values: big | small
size: small
sidebar: false
post: true # 将此处置为true即可
# You can set a language value if you prefer a translated version of CC license, e.g. deed.zh
# CC licenses are available in 39 languages, you can find the specific and correct abbreviation you need on https://creativecommons.org
language:

9. 置顶

文章header添加sticky,将会按照sticky值从大到小排序展示,默认为0

10. 更改字体

_config.next.ymlfont配置

1
2
3
4
5
6
7
8
9
10
11
12
13
14
15
16
17
18
19
20
21
22
23
24
25
26
27
28
29
30
31
32
33
34
35
36
37
38
39
40
41
# ---------------------------------------------------------------
# Font Settings
# ---------------------------------------------------------------
# Find fonts on Google Fonts (https://fonts.google.com)
# All fonts set here will have the following styles:
# light | light italic | normal | normal italic | bold | bold italic
# Be aware that setting too much fonts will cause site running slowly
# ---------------------------------------------------------------
# Web Safe fonts are recommended for `global` (and `title`):
# Arial | Tahoma | Helvetica | Times New Roman | Courier New | Verdana | Georgia | Palatino | Garamond | Comic Sans MS | Trebuchet MS
# ---------------------------------------------------------------

font:
enable: true

# Uri of fonts host, e.g. https://fonts.googleapis.com (Default).
host:

# Font options:
# `external: true` will load this font family from `host` above.
# `family: Times New Roman`. Without any quotes.
# `size: x.x`. Use `em` as unit. Default: 1 (16px)

# Global font settings used for all elements inside <body>.
global:
external: true
family: Noto Serif SC
#family: Lato
size: 0.8

# Font settings for site title (.site-title).
title:
external: true
family:
size:

# Font settings for headlines (<h1> to <h6>).
headings:
external: true
family:
size:

11. 相关文章

Related-Popular-Posts官方文档

  1. 安装插件
1
npm install hexo-related-posts
  1. 修改_config.next.yml
1
2
related_posts:
enable: true
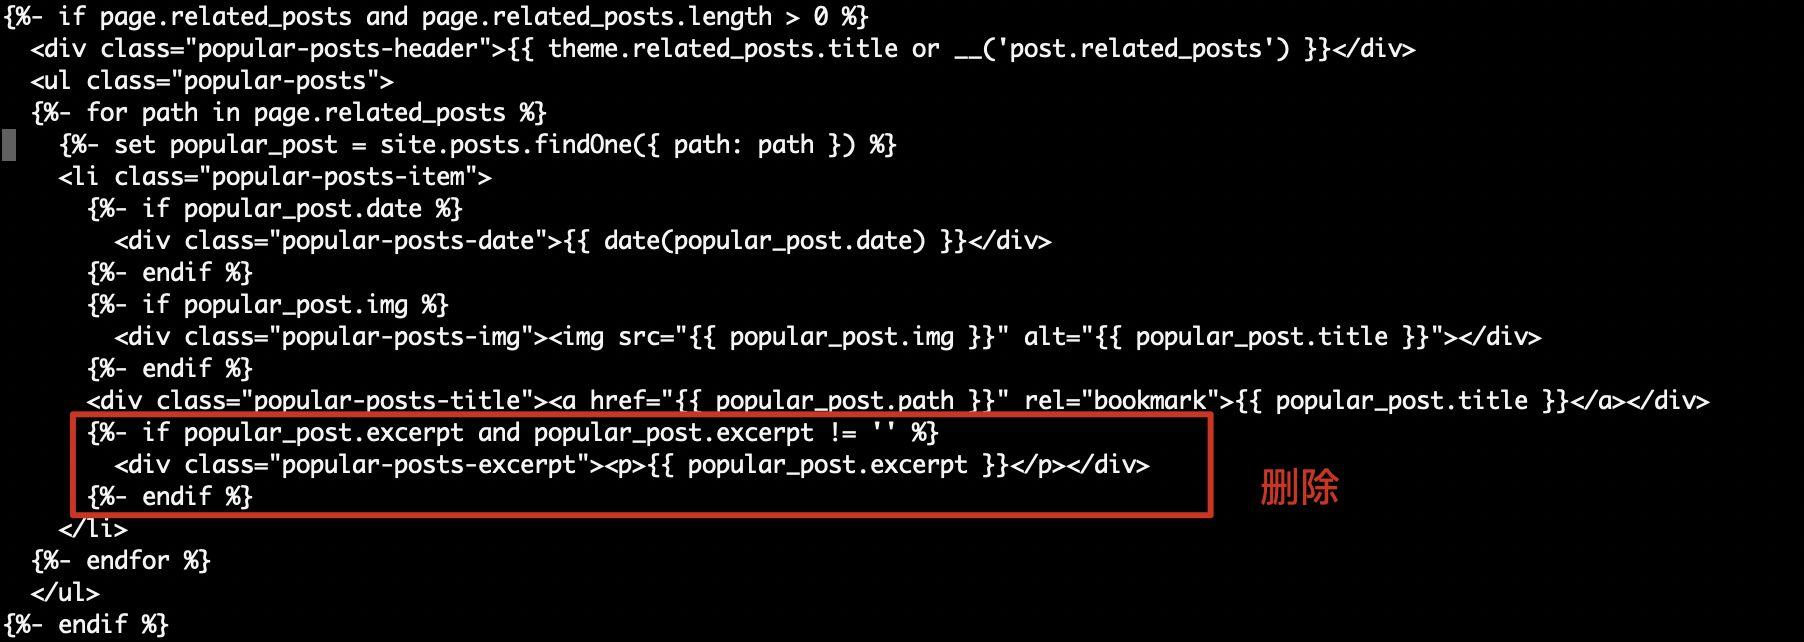
  1. 相关文章只显示时间和标题,不显示内容

修改/themes/next/layout/_partials/post/post-related.njk删除以下内容:
  1. 修复相关文章无法跳转问题

查看跳转链接可以发现,相关文章的路径是基于当前文章的,说明跳转连接用的是相对路径导致这个问题的,因此只需要采用绝对路径进行跳转即可。

修改/themes/next/layout/_partials/post/post-related.njk,在跳转路径前面加上/即可

12. Tags显示在文章头部

默认标签是显示在文章尾部的:

但在文章尾部不容易观察到,现令其显示在文章头部,效果如图:

/themes/next/layout/_partials/post/post-meta.njk文件中添加如下内容:

1
2
3
4
5
6
7
8
9
{# custom tags #}
{%- if post.tags and post.tags.length %}
{%- set tag_indicate = '<i class="fa fa-tag"></i>' if theme.tag_icon else '#' %}
<span class="post-meta-item">
{%- for tag in post.tags.toArray() %}
<a href="{{ url_for(tag.path) }}" rel="tag">{{ tag_indicate }} {{ tag.name }}</a>
{%- endfor %}
</span>
{%- endif %}

想要tag标签不在文章末尾显示,删除/themes/next/layout/_macro/post.njk文件中的如下内容即可:

13. back to top

Back To Top文档

_config.next.yml

1
2
3
4
5
6
back2top:
enable: true
# Back to top in sidebar.
sidebar: false
# Scroll percent label in b2t button.
scrollpercent: true

修改滚轮的大小,默认太小了,不易观察

滚轮样式定义在/themes/next/source/css/_common/components/back-to-top.styl文件中,查看该文件发现具体的大小有变量表示,其值定义在/themes/next/source/css/_variables/base.styl文件中

默认大小为12px,现将其改为16px

查看效果:

14. 添加备案信息

修改_config.next.yml

1
2
3
4
5
6
7
8
9
10
11
# Beian ICP and gongan information for Chinese users. See: https://beian.miit.gov.cn, http://www.beian.gov.cn
footer:
beian:
enable: true
icp: # 备案号
# The digit in the num of gongan beian.
gongan_id: # 公安备案号
# The full num of gongan beian.
gongan_num: # 备案链接
# The icon for gongan beian. See: http://www.beian.gov.cn/portal/download
gongan_icon_url: 公安备案图标

15. 首页和归档页单页显示数量

_config.yml

1
2
3
4
5
6
7
8
9
10
11
12
13
14
# Home page setting
# path: Root path for your blogs index page. (default = '')
# per_page: Posts displayed per page. (0 = disable pagination)
# order_by: Posts order. (Order by date descending by default)
index_generator:
path: ''
per_page: 5
order_by: -date

# 归档页面
archive_generator:
per_page: 50
yearly: true
monthly: true

16. 添加Waline评论系统

配置教程 Waline快速上手

LearnCloud地址

Waline地址

Vercel地址

评论管理 (管理端)

  1. 部署完成后,请访问 <serverURL>/ui/register 进行注册。首个注册的人会被设定成管理员。
  2. 管理员登陆后,即可看到评论管理界面。在这里可以修改、标记或删除评论。
  3. 用户也可通过评论框注册账号,登陆后会跳转到自己的档案页。

Hexo-waline-next插件使用rqh656418510/hexo-waline-next

安装插件:

1
npm install hexo-waline-next --save

17. 自定义Page

  1. 生成page
1
hexo new page "xxx"

会自动生成/source/xxx/index.md

  1. 启用page

修改_config.next.yml文件

1
2
menu:
精选: /recommend/ || fa fa-star

图标库地址